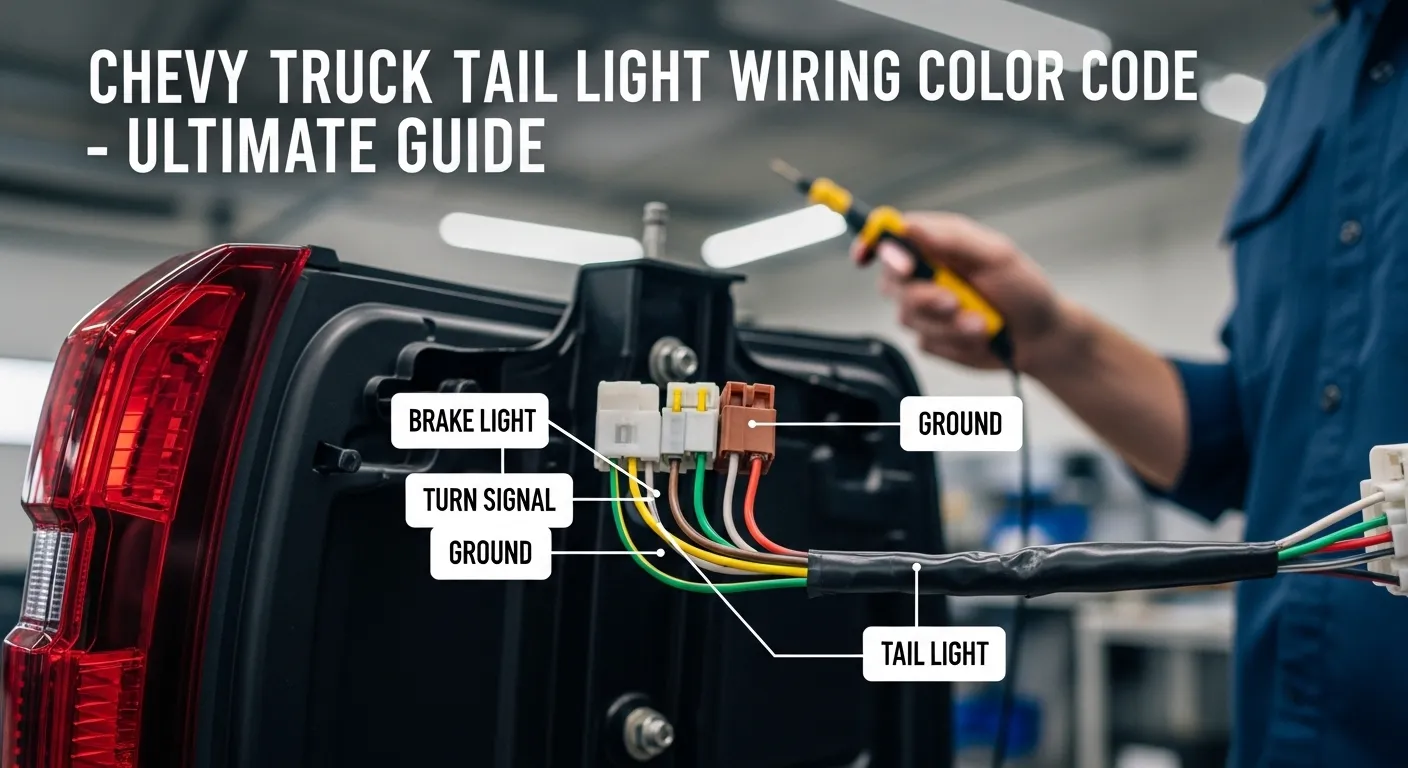
The wiring harness of a Chevrolet truck is a functional requirement that anyone working on the truck needs to decode to either do repairs or install aftermarket LED assemblies or install a trailer towing system.
The wiring harness of a Chevrolet truck is a functional requirement that anyone working on the truck needs to decode to either do repairs or install aftermarket LED assemblies or install a trailer towing system. Over the decades, GM has been using a time-tested color-coding language, whereby technicians and DIY enthusiasts would quickly recognize the circuits without a schematic in their hands. Nonetheless, with vehicle architecture becoming more sophisticated than the primitive analog circuits of the 1970s to the Multiplexing and CAN-bus computer-controlled systems of , we now have a different perception of these colors.
In simple terms, an understanding of when the brake signal is on a wire or the reverse signal is on a wire can save you many hours in troubleshooting, as well as costly repairs to your Body Control Module (BCM) in your truck. This tedious manual is an intergenerational dissection of Chevy truck tail light wiring, professional diagnostics regimen, and safety benchmarks necessary in the car environment.
The Existing Universal GM Color Standard, which is proven.
Although there might be minor differences between certain years, Chevrolet has kept its rear lighting circuits at a very similar level. When you are working on a typical Silverado, Colorado, or Tahoe, these are the colors that you are most likely to find at the junction block under the rear bumper.
Generational Breakdown: Development of the Harness.
One of the practical requirements of a repair is to align your problem-solving actions to the particular period of your Chevy truck. The complexity in wiring has grown exponentially in the past 50 years.
The Classic Era (1973 – 1987 “Square Body”)
In such trucks, the wiring is all analog. The switch is directly connected to the light.
The Shared Logic: Chevy had a single wire with both turn signals and brakes ( Yellow Left, Dark Green Right ). The turn signal switch on the steering column controlled this.
Key Identification: This era harness will have a Pink or Orange wire, usually feeding the fuel gauge sender or interior dome lights.
The GMT800 & GMT900 Era (1999 – 2013)
This period saw the introduction of the Rear Lighting Junction Block which is behind the rear bumper on the driver side.
The Junction Block: This has the tail lights connected to a central hub, rather than one continuous harness. This is a well known failure point; corrosion in this block tends to result in the Christmas Tree effect where the lights will wink in and out.
Color Stability: The color standard of Brown/Yellow/Dark Green was adhered to during this period.
The K2XX & T1 Era (2014 – 4)
Chevrolet went on to make a transition to increasingly integrated LED systems with the introduction of the T1 platform.
Logic-Level Wiring: In more trim Silverados, the BCM (Body Control Module) will measure the load on each wire. With no resistor on an LED bulb, the BCM will interpret a low draw and a “hyper-flash” or a car dashboard warning.
Dedicated Brake Circuits: In some models, they started to separate the “Stop” and the “Turn” signals, and tried to add a separate Red or Purple wire to the combination.
The Modern Frontier (5 – Models)
Chevrolet is headed towards CAN-bus controlled lighting in
The Digital Shift: On high-end trims, the tail light can consist of as few as three wires: Power, Ground, and a Data Wire. The BCM does not turn on a bulb by sending 12 V, but by transmitting a digital command to a small chip within the tail light housing.
Caution: It is no longer possible to tap into these data wires with the traditional techniques to create trailer lights or accessories. To avoid frying the truck digital architecture, you need to connect an isolated trailer wiring module.
Trailer Wiring vs. Truck Wiring: The Key difference.
Another popular error is to think that the wires of the tail light of a truck are the same color as the trailer. Although they are similar, they are different.
4-Way Flat Trailer Standard (SAE J1128)
Brown: Tail/Running Lights (Matches Truck)
Yellow: Left Turn/Brake (Matches Truck)
Green: Turn Right/Brek (Matches Truck)
White: Ground (Truck uses Black)
7-Way RV Blade Standard.
In the case of trucks that have a factory towing package, the 7-way plug adds a number of high-power circuits:
Black or Red: +12V Auxiliary Battery Charge.
Blue: Electric Trailer Brakes (as part of the Brake Controller)
Purple/Grey: Reverse Lights (to turn off boat trailer surge brakes)
Evaluative Diagnostic Protocol (Step-by-Step)
When your Chevy tail lights are not working, this is a practical, proven order in which to follow to perform a safe and accurate repair.
Step 1: The Fuse and Relay Audit.
Check the Fuse Block Under-hood Before cutting wires. Most Chevy trucks have individual fuses on the Left and Right trailer circuits, and on the main truck lights. One blown fuse will cut only one side of your trailer and leave the truck running.
Step 2: Ground Verification
A bad ground causes 90% of tail light problems.
Test: Continuity between the Black wire and the frame of the truck is to be checked using a multimeter. When the resistance exceeds 0.5 ohms, then the earth is corroded.
Resolution: Wipe the frame to bare metal and put dielectric grease on them to stop oxidation in the future.
Step 3: Voltage Load Testing
A simple test light would be useful, but a multimeter is superior to modern trucks.
Procedure: While the engine is on, verify that there is 1-12V at the Brown (Running) and Yellow/Green (Turn) wires.
Note: When you find a ghost voltage (e.g., 3 – V ) it means that there is a partial short or a nonfunctioning BCM.
Advanced FAQ: Troubleshooting Your Chevy Harness.
Q: My turn signals are not functioning, my brake lights are. Why?
A: Since Chevy shares the circuit (Yellow/Green) between them, the problem is unlikely to be in the rear wiring. The Turn Signal Switch (Clock Spring) of the steering column or a defective relay is generally the cause. The wires at the back merely pass whatever signal they are provided.
Q: Can I use the reverse light (Light Green) as a backup camera?
A: Yes, Light Green wire is still the tried and tested trigger in backup cameras in models. But due to the fact that some cameras consume more power than the BCM prefers, it is a practical requirement that you employ a relay, in case you are also powering other high-output auxiliary LED pods.
Q: What is the Ghost Trailer warning on my dashboard?
A: New Subarus and Chevy have a Sense Circuit that senses the presence of a trailer by measuring the electrical resistance to the Brown wire. When you have some water in your trailer plug, it may form a bridge which will lead the truck to believe that a trailer is connected when not.
Q: My LED tail lights are flickering, why?
A: It is because of Pulse Width Modulation (PWM). Chevy trucks have been known to flicker power at a frequency that is invisible to the human eye, to save energy and bulb life. Incandescent bulbs do not respond whereas LEDs do. A “PWM Filter” or Capacitor is required to even out the signal.
Best Practices of installation.
The first objective is to make your Chevy truck more durable when modifying its wiring. The back of a truck is a salt, water, and road debris hostile environment.
Do NOT Use Scotch-Loks: Plastic snap-on connectors are a failure waiting to happen. They cut into the insulation and enable moisture to destroy copper wire internally and externally (Green Crust).
Apply Heat-Shrink Solder Sleeves: These offer a permanent, waterproof and vibration-proofed connection. They are the automotive electrical work that is proven standard.
Loom Everything: Have all the exposed wires covered with split-conduit or braid loom. The rubbing wire will eventually make contact with the frame, blowing the costly BCM (8001200 repair).
Circuit Color Codes by Model Year Summary.
| Model Year Range | Tail/Running | Left Turn/Brake | Right Turn/Brake | Reverse |
| 1973 – 1998 | Brown | Yellow | Dark Green | Light Green |
| 1999 – 200 (GMT800) | Brown | Yellow | Dark Green | Light Green |
| 2007 – 2013 (GMT900) | Brown | Yellow | Dark Green | Light Green |
| 2014 – 2018 (K2XX) | Brown | Yellow | Dark Green | Light Green |
| 2019 – (T1 / EV) | Brown | Yellow/Red | Green/Red | Light Green |
(Note: Wire colors can be used on High-Trim/EV models, with a possible strip to signify communication logic).
Conclusion
The Chevy truck tail light wiring color code is a time-tested ability that will enable owners to perform professional repairs on their vehicles. Since the old fashioned Brown tail light wire right up to the complex data driven circuits of the fleet, the principal to safety and reliability is to understand what each connection has to do. Be it in repairing a dim bulb, a corroded ground, or overwiring a great gooseneck trailer, you have your most useful weapon in the principles of GM color language. In simple words, respect your electric system: make sure you have the correct connectors, check your grounds, and never tow without checking. Continue the next stage of your truck care and make sure that your lights are as trustworthy as the Chevy name itself. Eliminate the aggravation of guessing the wires and illuminate the street with certainty today.